Within the nme.geom package of Haxe NME you’ll find Matrices, Points, Vectors, Rectangles and… ColorTransform? It seems a slightly odd place to put it but it can be useful in your project to dynamically alter object colours. I wanted to talk briefly on how I’ve used it across my previous Pinball project and now, in Tower Defence.
Sometimes you want the same object to appear multiple times in your project, but with subtle variations. Behavioral changes can be accomplished in code by subclassing, size variations by scaling, but what if you wanted it red in one instance and green in another?
Including the same image twice with different colours feels redundant even if the images in question are quite small, so what are your options? In Pinball I used ColorTransform to colorize the lights and lighting effects with the image files themselves being greyscale. Now in Tower Defence I’m using it on some UI elements (the slider knob’s that change colour dependent on value).
Let’s step through how this works. First, of course, you have to create a graphic you want to use. Here’s the image of the slider knob in Tower Defence, as it came out of Photoshop…

As you can see, a simple graphic. The only flourish is the light catching it on one side. Now we’re going to reduce the colours to grey using the standard method: Here’s the key code section from the util I wrote to batch-greyscale images (in C#)…
Color newCol,px;
int tmpColor;
for (int i = 0; i < _loadedImg.Width; i++) {
  for (int j = 0; j < _loadedImg.Height; j++) {
    //gray = (0.299*r + 0.587*g + 0.114*b);
    px = _loadedImg.GetPixel(i, j);
    tmpColor = (int)Math.Round((px.R * 0.299) + (px.G*0.587) + (px.B *0.114));
    newCol = Color.FromArgb(px.A, tmpColor,tmpColor,tmpColor);
    _loadedImg.SetPixel(i, j, newCol);
  }
}
Our image now looks like this…
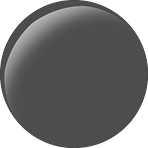
Much duller but also a smaller file size, and we can now recolor it in Haxe.
public static function colorizeRaw(b:BitmapData, targetR:Int, targetG:Int, targetB:Int):BitmapData {
  var b2:BitmapData = b.clone();
  b2.colorTransform(new Rectangle(0, 0, b.width, b.height), new ColorTransform(1, 1, 1, 1, targetR, targetG, targetB, 0));
  return b2;
}
To demonstrate the output, here are the colours that graphic changes to while being used as a slider knob. You can also experiment with the colours you use to initially create the graphic (darker means a darker grey, which means a darker, richer colour post-transform), and what you apply with the transform.
For reference, the RGB values applied to the images below are, in order left to right: (198,11,11); (198,108,11); (154,142,10) and (3,116,64).

That’s all folks! Hope someone finds this useful.